Showing posts with label Janelle. Show all posts

Tuesday, January 11, 2011

Chicken Alfredo Lasagna

I made this for dinner on New Year's Eve Eve this year. I'd made it once or twice before, but I haven't quite yet gotten my timing down right. The first time, we ended up eating at about 8:15pm. This time it was still about 7:30 when we finally sat down. Methinks I need to start preparing at 3:00 in the afternoon.

I got the recipe first from Michelle at Scribbit, which if you're not familiar with, you totally should be. She is an award-winning mom blogger, without the whole "mommy community" thing going on, which at times, can be quite cloying. The recipe as she found it was called Chicken Caesar Lasagna, but there's absolutely nothing Roman about it. Definitely no anchovies here. Just creamy, cheesy, vegetable-y goodness. I've made a couple of edits in the way of recipe helps.

Original recipe

Chicken Alfredo Lasagna

1 box lasagna noodles (about 15 noodles)
2 bottles light Alfredo sauce
3 tablespoons lemon juice
1/2 teaspoon fresh ground pepper
3 cups cooked chicken breast, diced or shredded
2 tablespoons olive oil
5 ounces chopped frozen spinach, thawed and drained
1/2 cup diced onion
1 red bell pepper, diced
2 carrots, diced
2 1/2 cups shredded mozzarella cheese

Preheat oven to 350 degrees. Cook noodles according to package directions, drain and rinse with cold water; drain again. (Hint: if you don't have a pot large enough to boil lasagna noodles in, and don't want to wait for half to soften enough to bend and fit the other half in the water -- they cook unevenly that way -- use a roasting pan. It's okay to get it out more than just for Thanksgiving, Christmas, and Easter.)


In a bowl combine Alfredo sauce, lemon juice, and black pepper. In a skillet saute onion, pepper and carrots in olive oil. Once onions are translucent (about five minutes) stir in spinach and cook one minute more.

Lightly grease a 13x9x2-inch baking dish with cooking spray. Add a scoop of sauce mixture to the bottom of the pan and smooth around to coat. Stir spinach mixture and chicken into Alfredo sauce. Arrange 4 noodles in bottom of dish. Top with one-third chicken mixture then 1/2 cup grated cheese. Repeat layers twice more. Use the last three noodles on the top of the last cheese layer. They won't overlap, but will provide a good guide for cutting up and serving later. Sprinkle the remaining cheese over the top layer of noodles.

Bake uncovered for 30-40 minutes or until heated through and browned on top. Let stand 15 minutes before serving. Makes 12 servings.


(This second picture was taken of cold leftovers the next day.)

Tuesday, January 4, 2011

Chocolate Chex Mix

My husband's family has a New Year's Eve tradition of making large batches of Chex Mix, and watching movies all afternoon and evening. He looks forward to that Chex Mix and relaxation. Try as I might, I haven't been able to get the Chex Mix recipe. It's not quite the original, which easily can be found online, but my mother-in-law has been making it for so many years that she no longer uses a recipe and doesn't know the measurements. So I've been unable to replicate the tradition. I've tried several substitutes -- Barbecue Chex Mix (FAIL!), Chex Muddy Buddies (too sweet and not munchy enough), and others. This year, a friend gave us some white chocolate Chex Mix as a Christmas treat. It was pretty good. Mind you, Ben does not like white chocolate at all, and since we've been married, I've lost my taste for it because it's so rarely, if ever, in the house. But this snack was really good. We gobbled it up almost entirely in one night.

So I decided to try to make it for New Year's Eve this year. I thought that Chocolate Chex might be a yummy twist on an original, so I bought that.


I also did little pretzel rods, dry roasted peanuts, M&M's, and, at the last minute, I added marshmallows.


I thought I had a bag of white chocolate chips in the cupboard, so I didn't buy any with the rest of the goodies. I'd forgotten that I had used about 2/3 of the bag on a yummy cookie recipe for a church activity at the beginning of the month. I still had a little less than 2/3 cup left. I also had about half a bag of vanilla-flavored white baking chips in the freezer. I'd asked my friend about her white chocolate coating. She said she just heated the white chocolate in the microwave with a little oil.

It didn't work. Not for me. For one thing, the baking chips are most definitely not the same as white chocolate chips (despite the ingredients being just about the same). They cooked differently, and I ended up burning the whole thing.

Crap.

My husband suggested that I just make a chocolate coating instead.

Duh.

I decided not to take anymore chances (read: waste anymore chocolatey goodness), so I Googled "chocolate candy coating recipe." The first hit was a dipping recipe from Hershey. Chocolate chips and shortening. Not oil. Not butter. Not margarine. Shortening. I wasn't sure I had any. The last time I remember buying any was probably two years ago.

Fortunately, that stuff has a shelf life longer than Twinkies. Yay!


So I made the chocolate coating -- in a double boiler, instead of in a less reliable microwave -- and poured it over the dry mix. I spread the whole thing out on parchment paper on two cookie sheets and stuck them in the fridge to solidify quickly, since it was already about 7:00pm on New Year's Eve.


Verdict: It was really good, but a little too sweet. I think my mix would have been fine if I'd been able to go with the white chocolate coating. The chocolate chocolate was good, but I'd have made a few modifications if I'd known I was going that route. First, I wouldn't have used Chocolate Chex. Second, I would have used less M&M's and more peanuts and pretzels. Either way, I should have used more marshmallows. The world can always use more marshmallows. I might also add a little peanut butter to the coating. Mmmmm...

8 cups Chex (though by the time I was done snacking before adding the chocolate coating, this may have been down to 7 cups...ssshhhh!!!)
2 cups dry roasted peanuts
2 cups pretzels (I'm a little anal and didn't want big pieces, so I used mini rods and broke them in half first)
2 cups plain M&M's
1 1/2 cups mini marshmallows
2 cups chocolate chips
2 Tbsp plus 2 tsp shortening

Mix the cereal, peanuts, pretzels, M&M's, and marshmallows in a large bowl or roasting pan. In a double boiler over medium heat, melt the chocolate chips and shortening together. When smooth, pour over dry mix. Use a rubber spatula to scrape down the boiler bowl and get every bit of yummy goodness! Mix the wet and dry ingredients together thoroughly, until all the dry goodies are well-coated.

Line two rimmed cookie sheets with parchment paper. Spread half of the Chex Mix on each one. Leave out to harden, or put in the fridge to harden more quickly. I think it only took 20 minutes for me in the fridge. Break into pieces and store at room temperature.


(Sorry I didn't get a dry picture -- the coated pictures are still while the chocolate was hot and melty.)

Friday, May 28, 2010

Root beer float ice cream cupcakes

Last year for my husband's birthday, I made a really yummy root beer float Bundt cake from Joy the Baker. Her recipe is a chocolate cake with root beer in it. It's really moist, and the longer it sits out, the more the spice and kick of the root beer comes out. This year, I thought I'd be a little adventurous and try making root beer float ice cream cupcakes. I found a recipe for root beer sherbet, which sounded also really yummy, and different than just plain vanilla. My plan was set.


Later in the week after I decided to make this creation for my husband's birthday, I came across a post on Scoopalicious about an ice cream cupcake contest (with -- yes -- a prize!). I thought it was perfect that I already had a plan. The contest is co-hosted by Scoopalicious and Cupcake Project (click links for contest info).


His birthday was on Sunday, so I made the cupcakes on Friday, hoping to let as much of the root beer flavor come out as possible. With the soda in the cake batter, it's really moist, so two days left out (if covered, even with a paper towel) won't dry them out terribly. Having only made the cake once, and never in cupcake form, I wasn't sure how much it would rise. It turned out that I used more batter per cup than I would have liked to, but there still ended up being a good enough balance.

Saturday night, some friends had us over for a barbeque and they gave my husband a lemon meringue pie (his favorite) for his birthday. Into the freezer went the cupcakes. I was hosting a book group discussion at my house on Thursday, so I decided to use them for that.


On Wednesday, I tried to make the sherbet. My ice cream bowl had been in the freezer for two or three days, so it was good and cold. My root beer had been in the refrigerator for two or three days, so it was also good and cold. I'd read the recipe in advance, and it said to leave the bottles (I used cans) open to let them go flat a bit first. Being that I'd originally planned on making the sherbet sooner than I did, I'd opened them and stuck them in the fridge. By the time I used them, they were completely flat. I mixed the root beer with the sweetened condensed milk and the half-and-half, and poured it into the mixer. After 30 minutes, there was absolutely no change in consistency. I think that I needed a little bit of fizz. Whoops. I poured the "sherbet" into a bowl and stuck it in the freezer anyway, and stirred it a few times during the day and evening. It ended up freezing, but it was too icy for me to use. (The flavor is really great, though, and I would definitely not be opposed to making it again. With fizz.) To the store I went that night for some plain vanilla ice cream.


Thursday morning, I left the ice cream out on the counter to soften a little. By the time I got back to it, I was glad I didn't wait any longer. The top was really soft, but just under it was just soft enough but still hard enough to allow me the time I needed to work on the cupcakes. I filled them each just to the top of the liner (I used jumbo cupcake liners...normal jumbo, not grotesque jumbo). Then back into the freezer they went.

I made up the frosting (which has root beer, melted chocolate, and cocoa powder in it, among other things) and scooped it into my bag. It was the first time I'd ever used my frosting bag. I've never piped frosting onto a cake or cupcake before. Welcome to the big league.


So, by the time I actually got around to eating one (last night), it just tasted like chocolate cake and vanilla ice cream, with frosting. There was a little more to it, but not enough that I could tell there was root beer involved. I took pictures today, and rather than sticking the starting-to-melt cupcake back in the freezer to re-freeze in a sad and wimpy state, I ate it. :) Today I could taste a little more of the root beer. Maybe it was that the cake part of the cupcake was bigger than last night's. Maybe it was that the frosting had had longer to germinate, so the root beer was coming out in it. Either way, I could definitely taste it today.


This afternoon I looked at the contest post over at Scoopalicious for the rules. I clicked over to the entries from 2008 and 2009 and found that I wasn't nearly as original as I thought. In 2008, Coconut & Lime entered this contest with a root beer float ice cream cupcake entry, albeit a different recipe. Last year, a sponsor of the contest was justJENN recipes (who has made root beer float ice cream cupcakes too -- using the same recipe that Joy the Baker used!), which, ironically was where I found the sherbet recipe, just doing a Google search. If the authors of either of those blogs read this, know that I wasn't trying to steal an idea. I thought I was mostly original, but I guess not.


For friends reading this: while this is a contest, only entrants can vote in the first round. If I make it to the second round, the public can vote, in which case I'll be soliciting your vote. :)

Tuesday, March 9, 2010

Rainbow Cupcakes

I made these rainbow cupcakes for the Young Women New Beginnings program this past weekend. I cheated and used a boxed cake mix, so this is more tutorial than it is recipe.

I recommend using plain white cupcake liners, instead of colored ones.

Cake mix, eggs, oil, and water as directed. Mix well.

Divide the cake batter equally into six different bowls. Get a separate spoon for each bowl. Add lots of food coloring. I used a lemon-flavored cake mix, so it was yellow to start with. My most difficult colors, the ones that required more drops than others, were the red and blue. I finally got good shades though. Don't be afraid to use a lot of food coloring to get the depth of color you really want.

Once your colors are shaded to your satisfaction, decide if you want to start at the top or bottom of the rainbow. I meant to do purple first, but spaced and did red first. It doesn't really matter much, though. Spoon all of one color into the bottoms of your cup liners. Repeat with the remaining colors. The layers won't really stay in even layers. They'll each squish each other a little farther down and cause a little more spreading to the outside, but all unevenly.

Bake according to package directions. (If you don't have enough batter to fill all the cups in a pan, fill the empty cups about 1/3 full of water, to help heat things more evenly.) When they come out of the oven, turn them out onto a cooling rack.

They'll be pretty, but maybe not exactly what you were expecting. That's okay. Let them cool completely.

I used Joy the Baker's recipe for brown sugar cream cheese frosting. I halved the recipe and still had a lot leftover. I didn't pipe the frosting on, though -- nothing fancy. I just spread it on and then added some colored (and white) sprinkles. The cupcakes look very unassuming.

Even unwrapped, they aren't very exciting yet...

Until you open them up. Then, it's a party on your plate, and in your mouth!

Wednesday, December 9, 2009

Decadent Chocolate and Peanut Butter Mousse Pie

I'm not quite sure where to start with this pie. When I first saw it and read the recipe, I knew I had to make it. It went on the menu for Thanksgiving. It goes together pretty easily, and can definitely be made the day before, to help cut down on day-of activity. I have a few complaints, though:

  1. It calls itself a mousse, but it's not. Mousse tends to use either no eggs or uses just egg whites (which is how it gets so fluffy). This recipe uses just egg yolks, which makes it more like a custard. I wasn't expecting it to be so heavy.
  2. The crust doesn't stay together very well. However, the last time or two that I made a graham cracker crust (instead of use a pre-made one), it also didn't stay together super well, so I think it may just be me. The chocolate layer in this pie actually helped out a little bit.
  3. It was too rich. It was just way too rich. Like, it hurt my throat. The second time I ate it. I gave myself a piece that was no more than an inch wide at the outside, and that was definitely at the upper limit of what I could handle already (and I'm not a dessert wuss).

Personally, I would probably give this recipe two stars, but my husband loved it and ate at least half of the pie himself.

Decadent Chocolate and Peanut Butter Mousse Pie (original recipe here)

Graham Cracker Crust:
12 to 14 whole graham crackers, crushed (about 1 1/2 to 2 cups crumbs)
6 tablespoons butter, melted

Dark Chocolate Layer:
¾ cup heavy cream
4 oz. semisweet chocolate, coarsely chopped

Peanut Butter Mousse Filling:
½ cup sugar
1 ½ tablespoons cornstarch
1/8 teaspoon salt
1 ½ cups milk
2 large egg yolks
1 teaspoon pure vanilla extract
¾ cup creamy or chunky peanut butter

Topping and Decoration:
Sweetened whipped cream
2 tablespoons crushed peanuts
3 tablespoons mini chocolate chips

Prepare the crust: Preheat the oven to 350. In a small bowl, combine the graham cracker crumbs and butter, stir until well blended. Using the palm of your hand, press the moistened crumbs into the bottom and up the sides of an ungreased 9- or 10-inch pie plate. Bake in the center of the oven for 7 to 8 minutes, or until the crust turns lightly golden. Set the pie crust on a wire rack to cool completely.

Prepare the chocolate layer: In a small saucepan, heat the cream over medium heat until it just comes to a simmer. Remove the pan from the heat, add the chocolate, and stir until melted and smooth. Pour the mixture into the cooled pie crust, smoothing it over the bottom and slightly up the sides. Freeze for 30 to 40 minutes, or until the chocolate layer is firm.

Prepare the mousse: In a heavy medium-size saucepan, combine the sugar, cornstarch, and salt. Add ½ cup milk and whisk until smooth. Add the remaining milk and the egg yolks and whisk until smooth. Set the saucepan over medium-high heat and whisk constantly until the custard comes to a boil. Still whisking, boil for 1 minute until very thick. Remove the pan from the heat and stir in the vanilla and peanut butter. Pour the mousse into the baked pie crust. Chill for 1 hour, or until firm. Before serving, decorate the pie with whipped cream and sprinkle with the chopped peanuts and mini chocolate chips, if desired.

Tuesday, December 8, 2009

Cranberry-turkey enchiladas

I was intrigued when I first saw this recipe. It sounded weird, but tasty at the same time. I love Mexican food, and you can't have turkey soup forever, so I gave it a try. I'm so glad I did. This will be a leftovers staple from here on out. It can even be made other times of the year, if (like me) you happen to have several pounds of leftover turkey in your freezer. We give four stars without hesitation.

I took some pictures of mine, but they actually make the meal look really gross, so I'll let you look at the photos on the site where I originally found the recipe. Here's a teaser for you:

The original recipe can be found here.

*************************
Cranberry-Turkey Enchiladas

2 to 2½ cups shredded cooked turkey
16 oz can whole berry cranberry sauce
15 oz can black beans, rinsed and drained
1½ cups bottled salsa
1 cup shredded colby and Monterey Jack cheese (4oz.) (or more, if desired)
½ cup sour cream
3 whole green onions, sliced
¼ cup snipped fresh cilantro
1 tsp ground cumin
½ tsp salt
½ tsp ground black pepper
Eight 7 to 8″ whole-wheat or regular flour tortillas
1 tsp bottle hot pepper sauce
cilantro, green onions and sour cream for garnish, optional

1. Preheat oven to 350°F. Lightly coat a 13×9-inch baking dish with cooking spray; set aside.

2. For filling, in a large bowl stir together turkey, half of the cranberry sauce, beans, ½ cup of the salsa, ¾ cup of the cheese, sour cream, green onions, cilantro, cumin, salt and pepper. Spoon about 2/3 cup filling on each tortilla. Roll up tortillas around filling. Place, seam sides down, in prepared dish; set aside.

3. For sauce, in bowl stir together remaining cranberry sauce, remaining salsa and hot pepper sauce. Spoon over filled tortillas. Cover with foil. Bake for 45 minutes. Uncover; top with remaining cheese. Bake 5-10 minutes more or until heated through and cheese is melted.

4. Sprinkle with additional cilantro and green onions.

Yield: 6 to 8 enchiladas
*************************

I didn't have hot sauce, and I didn't want to buy a bottle just to use on this recipe. I can handle Mexican heat, but I don't like the flavor of hot sauce. I did, however, have some green enchilada sauce leftover in a can in the fridge, and it had quite a bit of kick, so I added 1 1/2 tsp to the topping. It was way too hot -- you couldn't taste the rest of the food well enough. We always use medium heat salsa. If you use anything hotter than mild, don't bother putting hot sauce in the topping.

Thursday, November 5, 2009

Pumpkin Swirl Brownies

I've noticed lately that a lot of recipes I'm really liking come from Smitten Kitchen. These too. I saw this recipe last year, made them once, and thought I'd make them again this week. We had some friends over for dinner the other night, so I whipped them up then.

A couple of notes on the recipe first:
  • If you don't have a 9x9-inch pan, I wouldn't use an 8x8. I've got an 8x8, and they come out too thick. Next time I make them, I think I'll use my 11x7 and see how that works.
  • Don't split up the base batter the way the recipe instructs. Start with 1 cup in each of two bowls, then add the rest of the ingredients to each bowl. After that, continue to divide the base batter as needed.

Pumpkin-Swirl Brownies

8 tablespoons (1 stick) unsalted butter, plus more for pan
6 ounces bittersweet chocolate, chopped
2 cups all-purpose flour
1 teaspoon baking powder
1/8 teaspoon cayenne pepper
1/2 teaspoon salt
1 1/2 to 3/4 cups sugar (the original recipe calls for the larger amount; I think it could be dialed down a bit)
4 large eggs
1 tablespoon pure vanilla extract
1 1/4 cups solid-pack pumpkin
1/4 cup vegetable oil
1 teaspoon ground cinnamon
1/4 teaspoon ground nutmeg
1/2 cup chopped hazelnuts or other nuts (optional)

1. Preheat oven to 350 degrees. Butter a 9-inch square baking pan or dish. Cut a length of parchment that will cover the bottom and two sides (makes it much easier to remove), and line the pan with it. Butter the lining as well. (Deb note: I used an 8-inch square, because it was what I had. It works, too, but the brownies are crazy thick and take much longer to bake, just to give you a heads-up.)

2. Melt chocolate and butter in a heatproof bowl set over a pan of simmering water, stirring occasionally until smooth.

3. Whisk together flour, baking powder, cayenne, and salt in a large bowl; set aside. Put sugar, eggs, and vanilla in the bowl of an electric mixer fitted with the paddle attachment; beat until fluffy and well combined, 3 to 5 minutes. Beat in flour mixture.

4. Pour half of batter (about two cups) into a separate bowl and stir chocolate mixture into it. If you find that it is a little thick (as mine was) add a little more batter (a few tablespoons or so) until it is more pourable. This is important because mine was quite thick, and the pumpkin half was quite thin, so I had trouble swirling the two together.

5. In other bowl, stir in the pumpkin, oil, cinnamon, and nutmeg. Transfer half of chocolate batter to prepared pan smoothing top with a rubber spatula. Top with half of pumpkin batter. Repeat to make one more chocolate layer and one more pumpkin layer. Work quickly so batters don’t set.

6. With a small spatula or a table knife, gently swirl the two batters to create a marbled effect. Be sure to get your knife all the way to the bottom of the pan–I didn’t, and ended up with a chocolate base, not that it is such a bad thing. Sprinkle with nuts, if using.

7. Bake until set, 40 to 45 minutes. Let cool in pan on a wire rack. Cut into 16 squares.

Sunday, November 1, 2009

Frankenstein Brownie Pops

I'll warn you from the start that I have a bazillion pictures for this (some are good and some are blurry -- the blurry ones are ones when I was in a bit of a hurry). I got to choose my ward's book group book for the month of October, and we read Frankenstein. I ended up not liking it much (I had an issue with the writing style, but I learned a lot from it and we had a really good discussion), but I was still excited for the book group meeting this week. I wanted to go all out with fun treats. And I did.

A month or so ago, I saw this pan at Target, and was already formulating my idea.
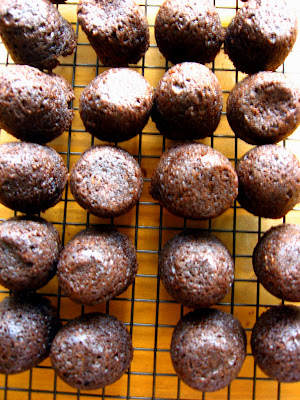
The day before book group, I baked a regular batch of brownies in this pan. I wouldn't recommend anything with chunks in it because you're dealing with smaller pieces and a mold. Obviously, I could only do eight pieces at a time, so it took several hours. You have to let the brownies cool all the way in the pan before you pop them out. If you don't you'll flatten or indent one end. One box of brownie mix made three pans plus one small ramekin. I did not stick any lollipop sticks in the brownies while they were still baking. You'll see why later on.


I put them in a container overnight, and the next afternoon (the day of book group), I went to work. My daughter was napping, I'd eaten lunch, and I had some good music on. I started with the candy coating. I had some bright/dark Christmas green that I mixed with white.

I like to melt it in a tall drinking glass, and then keep that warm in a pot of simmering water on the stove. It keeps it melted for as long as I need it. I also like to add a tiny bit (1/4-1/2 oz) of melted paraffin wax to make it a little thinner. I mix wax with chocolate when I dip truffles or peanut butter balls, too. It makes the finish shinier and makes the coating less clumpy. Paraffin wax can usually be found on the baking aisle at the grocery store.

At this point, I started dipping. I took a lollipop stick, got a little candy coating on it, and stuck it halfway (or so) into a brownie pop, and dipped it into the glass.
I dipped them all the way down the sides, but left the flat top completely uncoated. You can't leave the stick in for too long, or the candy coating will solidify.
Now is where it got tricky. I didn't want to smear or fingerprint the candy coating, but I didn't want the sticks coming out that end of the brownies. So I rigged up my cooling rack to work for me. I set out a cookie sheet on the counter, covered it with wax paper, and then in each corner, a stack, two-high, of tin cans. On top of the cans, I placed the cooling rack.


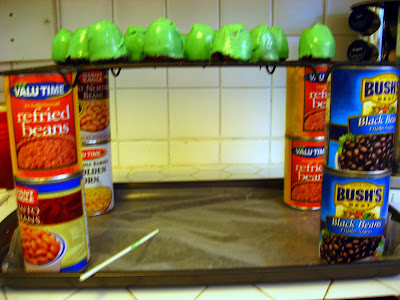
(I like beans, can you tell?)

That way I was able to place the brownie pops undipped side-down, and pull the stick out from underneath, having threaded it through the cooling rack.
Once the pops were all dipped, I started sticking chocolate chips in the narrow ends of the pops (the tops as you look at them now), with the pointed end toward the inside, to act as neck bolts. (You want to leave the water simmering with the candy coating glass in it at this point, because you're going to need to use it as "glue.") After you're done with the bolts, take some mini-chocolate chips, and attach them as eyes. I used the lollipop stick that had been my dipper to put little "glue" dots on the flat side of the mini-chips, then stick them to the brownie pops, closer to the flat ends.
Remember these are still all upside-down right now. Though incomplete, this is what they'll look like when turned right side up. Now you can see why we're leaving the flat top undipped. Frank needs hair. And a flat head.

Now it's time to melt some chocolate chips. If you've got pastry bags, great. If not, just use the snip-a-tiny-corner-off-a-Ziploc-bag method. You want to pipe a mouth on each of these guys, at about the level of the bolts. After each one, use a toothpick to draw the chocolate out at two even intervals, to both the top and bottom of the mouth. You're trying to make it look like stitches.

Once your mouths are all piped, it's time to insert the lollipop sticks (which are available, by the way, in the cake decorating aisles at Michaels, Jo-Ann, or any other store like that). If you have shish-kabob skewers, use one to carefully bore a hole into the rounded (and candy-coated) end of each Frankenstein. Go a little less than halfway or so. If you don't have skewers, just use a toothpick -- it's just not as thick, so the hole won't be as wide. Dip the lollipop sticks again into the candy coating, then carefully insert them into the holes you just made. Your chocolate mouths will probably not be dry yet, so be careful when you're handling the Frankensteins, not to smudge the mouths. Let them set for 15 minutes or so, just to make sure that everything is dried.

I used floral foam to hold the sticks. I covered it with cardstock, after punching holes in the cardstock for the sticks to go through. Here's the finished product:


I lost one. I think I pushed the stick too far through on this one. A lot of the tops had green candy coating hardened on the flat tops from the initial dipping.
It comes off pretty easily, but pulls some of the brownie with it. So I filled in the holes with some of the leftover melted chocolate chips. This one apparently had too big of a hold to fill.

The very first pop that I stuck chocolate chip bolts into, I stuck them in at the wrong end, but I didn't want to leave big holes there, so I left it. I basically did one upside-down. It looks pretty funky, and this Frank is bald.

Well, the concludes my lengthy tutorial. Thanks for reading, if you're still here. :)

(If you're not familiar with Bakerella, check her out here. She was my inspiration for this project.)

Saturday, October 31, 2009

Finger Jell-O Blocks

I have two thing to contribute to Halloween food, but the second one will have its own pot, because it's long.

I didn't take a picture of these because they didn't quite turn out (aesthetically) the way I wanted. I found this recipe way back at 4th of July, and adapted the colors/flavors for the spooky holiday. See the original here.

So I won't type out the whole thing (you can go read it there), but I'll tell you my adaptation. I did a layer of yellow (lemon), then a layer of white (piña colada if you can find it, but there's a recipe in the link if you can't that involves sweetened condensed milk), then black (black cherry with extra food coloring to darken it), then orange (peach with extra coloring...I though I had orange, but I didn't), and then purple (grape). Unfortunately, you could tell the orange apart from the two dark colors on either side of it, so it looked like yellow-white-thick dark layer.

This recipe could easily be adapted for any colorful holiday -- Valentine's Day, St. Patrick's Day, 4th of July, Christmas, even Easter.

Be sure you read the recipe all the way through before starting, because you don't make the Jell-O the typical way. It's a quick set method.

Friday, October 23, 2009

Chicken, Hominy, and Cilantro Chili

This is one of my favorite meals ever. Absolutely positively five stars.

The first time I made it, I followed the instructions, and it took around 3 hours (maybe more) to make. So it was another year or so before I made it again. You can use the chicken thighs to make it, like the instructions say, but it's much easier and faster to use boneless skinless chicken breasts. The dark meat will have a better flavor, but this way you don't have to skin and de-bone the pieces, after letting them cool long enough to touch. And it won't make a huge mess. Just let the breasts cool for a few minutes, then shred them with your hands or with forks.

The recipe also calls for a cup of beer. It cooks long enough that the alcohol content wouldn't be anything to worry about (I know most, if not all, of you/us are LDS), but that's still a lot. A couple of tablespoons maybe wouldn't be as big a deal. My husband really didn't want me to use beer. I did some hunting around and found a good substitute on this site: ginger ale. Ginger ale gives good flavor that you wouldn't get if you just substituted water. It give a little carbonation, but it lacks the yeast that beer has. The yeast is what helps the cornmeal really thicken up at the end. It still tastes fantastic, though.

For the chicken stock, I just use bouillon.

I don't normally like to use my food processor for vegetable chopping (I like it for real disintegration, or cheese shredding), but for soups I don't mind it. Just put the peppers and onions (and jalapeños, if you have a mini-bowl) in, and it's a snap.

For the polenta: I had to do a little research on this. I learned that it's a dish made from ground maize. Basically it's grits, which are ground hominy, ironically. So I have a can of grits in my cupboard that I pretty much only ever use for this. I don't make the 2 cups that this recipe calls for -- it's overkill. For my husband and I, I just follow the instructions on the canister for 1 serving, and divide it in half. It adds a nice touch. When we have leftovers, I don't bother making the grits again.

I usually use a 15 oz. can of hominy, because I'm not sure I've ever seen a 19 oz. can.

(I've decided that my pictures of soup pretty much all suck and make the food look very not appetizing, and even kinda nasty, so this is a scan of the photo in the cookbook.)


From the Williams-Sonoma Chicken cookbook, page 55,

Chicken, Hominy, and Cilantro Chili

4 Tbsp olive oil
12 chicken thighs, skin on and bone in
Salt and pepper
2 yellow onions, chopped
2 red bell peppers, seeded and chopped
1 or 2 jalapeño chiles, seeded and minced
2 cloves garlic, minced
1 tsp dried oregano
1 tsp ground cumin
2 cups chicken stock
1 cup lager beer
1 tbsp tomato paste
1/4 cup yellow cornmeal
1 can (19 oz) hominy, rinsed and drained
1/2 cup chopped fresh cilantro
2 cups instant polenta, cooked according to package directions

In a large Dutch oven, heat 2 tablespoons o the oil over medium-high heat. Season the chicken with salt and pepper. In batches, add the chicken and cook, turning occasionally, until browned, about 8 minutes. Transfer to a plate and set aside.

Pour off the fat from the pot. Return the pot to medium heat and heat the remaining 2 tablespoons oil. Add the onions, bell peppers, and chiles to taste and cook uncovered, stirring oftenm until softened, about 5 minutes. Add the garlic, oregano, and cumin and cook, stirring, for 1 minute. Stir in the stock, beer, and tomato paste. Return the chick to the pot. Raise the heat to high and bring to a boil. Reduce the heat to low, cover, and simmer until the chicken shows no sign of pink when the thickest parts are cut into near the bone, about 30 minutes.

Using kitchen tongs, remove the chicken from the pot and let cool slightly. Discard the skin and cut the meat from the bones. Cut the meat into bite-sized pieces and return them to the pot. In a small bowl, whisk 1/2 cup of the broth with the cornmeal; stir into the pot along with the hominy and cilantro. Simmer until the chili thickens, about 10 minutes. Taste and adjust the seasoning with salt and pepper.

Spoon the polenta into warmed individual bowls, top with the chili, and serve hot.

Sunday, October 18, 2009

Caramel Apple Bars

This recipe is just so yummy. I made it for the first time last year, and I had to make it again this year. I tweaked it only slightly this time around, but it's really just to die for.

You may know that I always add more cinnamon than a recipe calls for. My mother taught me that whatever the recipe says is never enough. In my house, we usually double it. So that's what I did with this recipe (and pretty much anything I ever make that calls for cinnamon). Here's the tweak: This recipe has you make your own caramel to drizzle. It makes more than you actually need, so you can just chill the rest to cut up and wrap individually later. The recipe has you drizzle 1 cup over the top of the apples. This time around I did about 1 1/2 cups, just because I didn't distribute it very evenly to begin with, and it actually made a difference. Last year when I made these, I noticed that the crust -- although still delicious -- started to get soggy on the second day. This time, it stayed pretty crunchy/chewy instead of soggy until the third day (and by then there was only one or two bars left anyway!). So use as much of the caramel as you need to cover the whole thing -- don't be stingy!

Caramel Apple Bars

HOMEMADE CARAMEL:
1 cup heavy whipping cream
2 cups brown sugar
¼ cup light corn syrup
4 Tbsp butter
1 tsp pure vanilla extract
¼ tsp salt

CRUST:
1 cup brown sugar
¾ cup butter
1 tsp ground cinnamon (Double up!)
¾ tsp salt
½ tsp baking soda
1 cup all-purpose flour
1 cup ground pecans
2 cups rolled oats

FILLING:
3½ cups sliced apples (about 24 ounces) (I used Granny Smiths, and it was about 2.5 apples)
½ tsp salt
½ tsp ground cinnamon (Double up!) 1 cup homemade caramel

Preheat oven to 400 degrees. Line 9x13-inch pan with foil and lightly spray with cooking spray. Prepare caramel: Mix caramel ingredients in a 2-quart saucepan. Heat over medium, stirring constantly, until it reaches soft-ball stage (230-234 degrees). Remove from heat.

In a medium bowl, beat the brown sugar and the next 4 ingredients (through baking soda) until thoroughly combined. Mix in the flour, ground pecans and oats until crumbly. scoop out 1 cup and set aside. Place the remaining crumbs into your prepared pan and press down firmly to coat the bottom.

Toss apples in a large bowl with the salt and cinnamon. Arrange them over the crust. Drizzle 1 cup of warm caramel over the top and the sprinkle with the remaining crumbs you set aside.

Bake 35- 40 minutes until bubbly and the apples are just tender. Remove and let cool until they are just warm to the touch. Cut into squares. Try and let the bars rest until the caramel has set before serving.

(Original recipe here.)

Thursday, October 15, 2009

Chicken Cream Cheese Soup

I love Fall for so many reasons, one of them being that it's time to make soup again. This soup is pretty easy to make (it requires a lot of chopping, but it's nothing difficult), and it's so good. There can be hardly a better comfort food.

I found it on The Sisters' Cafe about a year ago, and knew it would be good. I have an eye for good recipes, but this one surpassed my expectations. The original recipe can be found here, but I've tweaked it just a little.

Chicken Cream Cheese Soup

1 lb chicken (breasts or combination)
1-2 Tb butter
1 onion, diced
2 handfuls baby carrots (about 2 cups sliced small)
2-3 stalks celery, sliced
4-5 potatoes, diced small
1 c milk
1/4 c flour
8 oz package cream cheese, softened and cubed

Put chicken in pot and cover with water, add seasonings (I use salt pepper, sage, basil, poultry seasoning, and onion); boil until cooked. Take chicken out of water but keep the broth. When chicken is cool, shred.

Saute onion in butter. Put onion in pot and add carrots and potatoes. Add 3-4 cups of broth or enough to cover vegetables. Add bouillon cubes or soup base for flavor (I add 4 bouillon cubes). Bring to a boil and simmer until veggies are tender.

Mix flour with milk and add to soup. Add chicken. Add cream cheese to soup and stir until melted. Season with salt and pepper if desired.

I don't care what my husband would rate this (though I suspect it's at the very least a 4.5), this is a five-star meal.

Saturday, September 26, 2009

Southwest Rice and Bean Salad

I had something specific in mind for dinner last night, but I came across this recipe mid-afternoon and decided I had to try it.

It went together really easily. I would probably use less rice in the future, though. Five cups is a lot, even when you're mixing lots of other stuff in. I wanted to use brown rice, but we were out of it. It would probably be even yummier with brown vs. white rice.

I made a few modifications from the original recipe, based on what I had at home already. Overall, it was really yummy, did well as leftovers, and got about 4.5 stars. I really really liked it, but my husband said only 4 stars -- it would be 5 if it didn't have the rice, he said (he doesn't like rice).

A couple of quick notes: the salad comes out tasting surprisingly sweet, due to the brown sugar in the dressing. It's really different, and yummy. Also, the chicken breasts I had in the freezer were the flat single-serving cutlet-style breasts, not full sized ones. Two wasn't enough. If that's the kind you have, go with three or four.

*************************
5 cups cooked rice, warm or at room temperature
1 can black beans, drained and rinsed
1 can kidney beans, drained and rinsed
2 cups cooked, cubed chicken
1 can corn, drained
4 green onions, chopped (I didn't have green onions, so I used about 1/4 cup chopped red onion)

Dressing:
1/4 cup fresh lime juice
2 tablespoons red wine vinegar
2 tablespoons packed brown sugar
2/3 cup canola oil (I used vegetable oil)
4 pickled jalepeño pepper rounds (I used about 2/3 of a can of diced green chilies instead)
2 teaspoons chili powder
1 teaspoon cumin

Combine all of the salad ingredients together in a large bowl. Combine dressing ingredients in blender until peppers are finely minced. Toss with salad. Serve warm or at room temperature.
*************************

Monday, September 14, 2009

BBQ sauce marinade

My post for this challenge isn't very exciting. We barbecued some chicken on Labor Day last week, and I marinated with a little BBQ sauce. I thawed the chicken breasts, poked them with forks, and then put them in a giant Ziploc bag. I poured in some Pepsi and some BBQ sauce, in about equal portions. Squeezed most of the air out, zipped it up, squished it around, and stuck it in the fridge. I let it marinate for about 30 minutes, turning and squishing it once or twice during that time.

Sunday, September 6, 2009

Tomato and Corn Pie

A friend gave me some fresh zucchini and tomatoes from her garden a couple of weeks ago. The zucchini was promptly made into bread, but the last tomato stayed in my refrigerator for a week. I finally had an opportunity to use it last night, with the addition of two more large beefsteak tomatoes. I found this recipe and thought it looked and sounded really yummy, and I've gotta tell you -- it just begged me to make it.

I read the whole recipe a few times, and I had no idea how long it was going to take to prepare it. I started at 3:30 on Saturday afternoon, and at 5:40 I stuck the pie in the oven. During that time, I had to run to the store to buy mayonnaise, since my lovely husband had neglected to tell me we'd been out of it for several weeks (I don't eat it). I just really hoped that after two hours of prep time that it would be worth it. Well, it wasn't absolutely fabulous, but neither was it a disappointment.

A few notes:
  • The tomatoes take the longest. Peeling them is important -- it will affect the end texture. Also, if you don't want massive gooiness and sogginess, you'll need to take the time to scrape out the seed and the liquidy sections of the tomatoes.
  • Two cups of flower for the crust is not enough. I added close to another half cup more to get it dry enough to not stick to everything in sight. It says to stick the second half in the fridge to keep it cold while you do everything else, but I found that the dough was not as malleable as I wanted when I pulled it out again. It needed a little bit of warmth to keep it soft.
  • I'm not sure what the point of chopping the corn was -- I forgot to do it. I used canned corn, which I drained and rinsed and drained again. One can was enough.
  • The leftovers are good, but not great. If you can make this for a bigger crowd, I would.
  • My husband and I ate this for a meal itself, but it's probably more of a side dish.
All in all, it was good, and I'll make it again. Not frequently, as it takes two hours (plus bake time), but we gave it four stars.

*************************
Tomato and Corn Pie

2 cups all-purpose flour
1 tablespoon baking powder
1 3/4 teaspoons salt, divided
3/4 stick (6 tablespoons or 3 ounces) cold unsalted butter, cut into 1/2-inch cubes, plus 2 teaspoons melted
3/4 cup whole milk
1/3 cup mayonnaise
2 tablespoons fresh lemon juice
1 3/4 pounds beefsteak tomatoes
1 1/2 cups corn (from about 3 ears), coarsely chopped by hand (my preference) or lightly puréed in a food processor, divided
2 tablespoons finely chopped basil, divided (skipped this, no harm was done)
1 tablespoon finely chopped chives, divided
1/4 teaspoon black pepper, divided
7 ounces coarsely grated sharp Cheddar (1 3/4 cups), divided

Whisk together flour, baking powder, and 3/4 tsp salt in a bowl, then blend in cold butter (3/4 stick) with your fingertips or a pastry blender until it resembles coarse meal. Add milk, stirring until mixture just forms a dough, then gather into a ball.

Divide dough in half and roll out one piece on a well-floured counter (my choice) or between two sheets of plastic wrap (the recipe’s suggestion, but I imagined it would annoyingly stick to the plastic) into a 12-inch round (1/8 inch thick). Either fold the round gently in quarters, lift it into a 9-inch pie plate and gently unfold and center it or, if you’re using the plastic warp method, remove top sheet of plastic wrap, then lift dough using bottom sheet of plastic wrap and invert into pie plate. Pat the dough in with your fingers trim any overhang.

Preheat oven to 400°F with rack in middle. If your kitchen is excessively warm, as ours is, go ahead and put the second half of the dough in the fridge until you’re ready to use it. Whisk together mayonnaise and lemon juice.

Cut an X in bottom of each tomato and blanch in a large pot of boiling water 10 seconds. Immediately transfer with a slotted spoon to an ice bath to cool. Peel tomatoes, then slice crosswise 1/4 inch thick and, if desired , gently remove seeds and extra juices. Arrange half of tomatoes in crust, overlapping, and sprinkle with half of corn, one tablespoon basil, 1/2 tablespoon chives, 1/2 teaspoon salt, 1/8 teaspoon pepper and one cup of grated cheese. Repeat layering with remaining tomatoes, corn, basil, chives, salt, and pepper. Pour lemon mayonnaise over filling and sprinkle with remaining cheese.

Roll out remaining piece of dough into a 12-inch round in same manner, then fit over filling, folding overhang under edge of bottom crust and pinching edge to seal. Cut 4 steam vents in top crust and brush crust with melted butter (2 teaspoons). Bake pie until crust is golden and filling is bubbling, 30 to 35 minutes, then cool on a rack. Serve warm or at room temperature.
*************************

I'll be honest. I was intimidated by this recipe. I've never made a pie crust before (graham cracker doesn't count). I had to improvise, because like I said, the recipe doesn't call for enough flour. The crust turned out really well though, and I was quite pleased with myself. It would be great to use to make buttermilk biscuits. I've also not really ever done anything more with tomatoes than chop them up and put them in things, so to have to blanch them and peel them and scrape them seemed like a lot to me. The pie looked too good to let be be too intimidated, though, and I'm glad I won the battle. You should really go read the original post about it, not just my re-posting of the recipe here.

(Sorry for the lack of pictures...my camera is broken.)

Monday, August 31, 2009

Blueberry Sour Cream Ice Cream

EDIT: I uploaded a couple of photos of the ice cream while I was making it. The colors are beautiful (as you will read below).

Last week, I saw a link to this old post on one of my favorite food blogs. I'm not generally a fan of blueberries, but my husband -- having grown up in Maine -- loves them. The pictures were beautiful (I love colorful food!), so I thought I'd give it a try for this week.

The ice cream is pretty easy to prepare -- and the coloring really is gorgeous. I think my husband has the camera right now, but I took some pictures of the dark blue berries, the bright white sugar, and the bold green lime zest in the pan together. Then, while it was all cooking, the berries bled and the juice turned purplish. Absolutely gorgeous.

Okay, enough gushing about the colors. The prep is easy; then you just stick the blender in the refrigerator to cool the mix down, and when you're ready, just turn your ice cream mixer on and let it churn for about 25 minutes.

A couple of notes on this:
  • It didn't make very much. If you're making it for the whole family (or a group), you might want to double it. I made it for company, and ended up baking a pan of brownies to supplement. It went really great with the brownies.
  • I had to soften it in the microwave to scoop it (it had been in the freezer for about 22 hours)
  • Like I said, I'm not generally a fan of blueberries, but I did enjoy this. It was a little too tart, though. I prefer my ice cream sweeter.
  • My husband said it could use a touch less sour cream (he recommended 2/3 of a cup, instead of the 3/4 of a cup that the recipe called for). That said, he loved it and gave it 5 stars.
  • Serving it with brownies already, I didn't do any chocolate or fudge sauce on top. It was fine without it, though.
*************************
Blueberry Sour Cream Ice Cream

1 cup blueberries (fresh or frozen, if frozen, thaw and drain)
1/3 cup sugar, or more to taste
pinch of salt
grated zest and juice of 1/2 lime, or more juice to taste
3/4 cup heavy cream
3/4 cup sour cream

Put the blueberries, sugar, salt, lime zest and juice in a medium saucepan and cook over medium heat, stirring, until mixture boils and the berries pop and soften, about 3 minutes.

Turn the berries into a bender and whirl until you have a fairly homogenous puree, about 1 minute. (It will never be completely smooth, and that’s fine!) Add the heavy cream and sour cream and pulse just to blend. Taste and, if you’d like, and a squirt more lime juice or a tiny bit more sugar.

Pour the custard into a bowl and refrigerate until it is chilled before churning it into ice cream.
*************************

Enjoy!