A month or so ago, I saw this pan at Target, and was already formulating my idea.
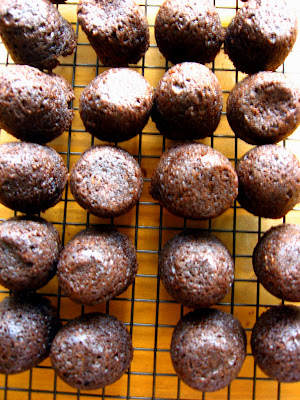
 The day before book group, I baked a regular batch of brownies in this pan. I wouldn't recommend anything with chunks in it because you're dealing with smaller pieces and a mold. Obviously, I could only do eight pieces at a time, so it took several hours. You have to let the brownies cool all the way in the pan before you pop them out. If you don't you'll flatten or indent one end. One box of brownie mix made three pans plus one small ramekin. I did not stick any lollipop sticks in the brownies while they were still baking. You'll see why later on.

I put them in a container overnight, and the next afternoon (the day of book group), I went to work. My daughter was napping, I'd eaten lunch, and I had some good music on. I started with the candy coating. I had some bright/dark Christmas green that I mixed with white.

I like to melt it in a tall drinking glass, and then keep that warm in a pot of simmering water on the stove. It keeps it melted for as long as I need it. I also like to add a tiny bit (1/4-1/2 oz) of melted paraffin wax to make it a little thinner. I mix wax with chocolate when I dip truffles or peanut butter balls, too. It makes the finish shinier and makes the coating less clumpy. Paraffin wax can usually be found on the baking aisle at the grocery store.
 At this point, I started dipping. I took a lollipop stick, got a little candy coating on it, and stuck it halfway (or so) into a brownie pop, and dipped it into the glass.
 I dipped them all the way down the sides, but left the flat top completely uncoated. You can't leave the stick in for too long, or the candy coating will solidify.
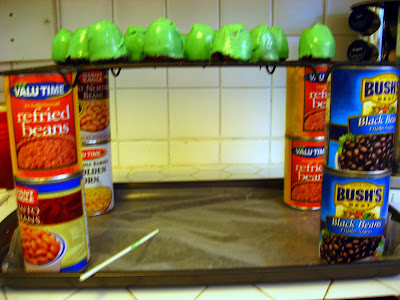
 Now is where it got tricky. I didn't want to smear or fingerprint the candy coating, but I didn't want the sticks coming out that end of the brownies. So I rigged up my cooling rack to work for me. I set out a cookie sheet on the counter, covered it with wax paper, and then in each corner, a stack, two-high, of tin cans. On top of the cans, I placed the cooling rack.
That way I was able to place the brownie pops undipped side-down, and pull the stick out from underneath, having threaded it through the cooling rack.
 Once the pops were all dipped, I started sticking chocolate chips in the narrow ends of the pops (the tops as you look at them now), with the pointed end toward the inside, to act as neck bolts. (You want to leave the water simmering with the candy coating glass in it at this point, because you're going to need to use it as "glue.") After you're done with the bolts, take some mini-chocolate chips, and attach them as eyes. I used the lollipop stick that had been my dipper to put little "glue" dots on the flat side of the mini-chips, then stick them to the brownie pops, closer to the flat ends.
 Remember these are still all upside-down right now. Though incomplete, this is what they'll look like when turned right side up. Now you can see why we're leaving the flat top undipped. Frank needs hair. And a flat head.
Now it's time to melt some chocolate chips. If you've got pastry bags, great. If not, just use the snip-a-tiny-corner-off-a-Ziploc-bag method. You want to pipe a mouth on each of these guys, at about the level of the bolts. After each one, use a toothpick to draw the chocolate out at two even intervals, to both the top and bottom of the mouth. You're trying to make it look like stitches.
Once your mouths are all piped, it's time to insert the lollipop sticks (which are available, by the way, in the cake decorating aisles at Michaels, Jo-Ann, or any other store like that). If you have shish-kabob skewers, use one to carefully bore a hole into the rounded (and candy-coated) end of each Frankenstein. Go a little less than halfway or so. If you don't have skewers, just use a toothpick -- it's just not as thick, so the hole won't be as wide. Dip the lollipop sticks again into the candy coating, then carefully insert them into the holes you just made. Your chocolate mouths will probably not be dry yet, so be careful when you're handling the Frankensteins, not to smudge the mouths. Let them set for 15 minutes or so, just to make sure that everything is dried.
I used floral foam to hold the sticks. I covered it with cardstock, after punching holes in the cardstock for the sticks to go through. Here's the finished product:


I lost one. I think I pushed the stick too far through on this one. A lot of the tops had green candy coating hardened on the flat tops from the initial dipping.
 It comes off pretty easily, but pulls some of the brownie with it. So I filled in the holes with some of the leftover melted chocolate chips. This one apparently had too big of a hold to fill.
The very first pop that I stuck chocolate chip bolts into, I stuck them in at the wrong end, but I didn't want to leave big holes there, so I left it. I basically did one upside-down. It looks pretty funky, and this Frank is bald.

Well, the concludes my lengthy tutorial. Thanks for reading, if you're still here. :)
(If you're not familiar with Bakerella, check her out here. She was my inspiration for this project.)


4 comments:
those are ... not "cute" exactly, but awesome!
it looks like you had some mad fun with them! booowahahaha! thanks for sharing!
Aren't you a Bakerella in the making!
Awesome! I will definitely be trying those out next Halloween.
Post a Comment